Have you added Facebook Event Codes to your website? If not, you are missing out on some great marketing potential.
In this article I take you through the step by step process to create and add the Facebook Pixel to your WordPress website and then create standard Facebook Event Codes to enhance your marketing. But first, let me explain why you want to do this.
What Is The Facebook Pixel?
Have you ever been scrolling through Facebook and seen an ad for the exact product you had just been looking at? That’s because the business has added Facebook Event Codes to their website.
Facebook Event Codes are a powerful way to reach out to people who have already shown an interest in your product or service. The base code is added to your website to store information about your website visitors and their actions to enable you to market to them more effectively with the Facebook platform.
You don’t have to be a web developer to do this, with the use of plugins and Facebook’s own Event Setup Tool, even a novice can do it with a little bit of help. So get your learning head on and let’s dive in.
How To Create The Facebook Pixel Base Code
The first thing you need to do is create the Facebook Pixel base code which goes on every page of your website. To do this you need to have a Facebook Ad account. If you already have one, simply click on ‘Manage Ads’ from your Facebook business page. If not, then you need to select create ads and create an ad account first.
Once you are in Ads Manager (you will be taken to this screen when you click on ‘Manage Ads’) Select ‘Events Manager’ from the top left menu and this will open on the ‘Data Sources’ tab. You will then see the option below. ‘Facebook Pixel: Track Website Activities’. Click on the ‘Get Started’ button.
![]()
Click on this and you will then get a further three options .
- Add code using a Partner Integration
- Manually add pixel code to website
- Email instructions to a developer
In this instance, we will select option 2.
You will then be taken to a page with html for the base code. Click anywhere on the code and it will automatically be copied. This code is to be placed at the bottom of the header section, just above the tag on each page of your website but DON’T PANIC, this is easier than it sounds.
![]()
Don’t click on anything on this page yet as we will go through the next part once the base code is on your website.
You now have the code needed to add your WordPress website.
How To Install The Facebook Pixel Base Code On WordPress
It’s now time to go over to your website and log into the dashboard. You can install the code via plugins or adding the code directly. If you have little or no experience I recommend using a free plugin to do this, to ensure that you don’t make a mistake with your website code.
To add a plugin, go to Plugins from your tabs on the left, and select ‘Add New’.
I recommend a free plugin called ‘Insert Headers and Footers’ so type this in the box on the right (above the available plugin visuals). Select the plugin and click on ‘Install’. Once it is installed, click on ‘Activate’.
![]()
Once the plugin has been installed, you will find it under the settings tab on the left and look down the list until you find it. When you click on it, you will be shown a screen with three boxes, one for scripts in header, scripts in body and one for scripts in footer.
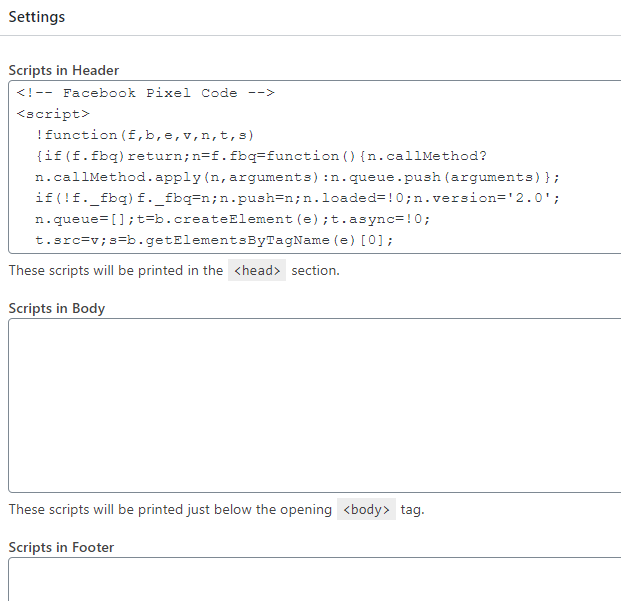
As you have already copied the code from Facebook, simply right click on your mouse in the ‘Scripts in Header’ box and click ‘paste’. This will then add the html code in the box. Then click on ‘Save’. And that’s it! You have now installed the Facebook Pixel Base code to every page on your website.
This will now allow you to create Facebook Ads to people who have visited your website. The next thing to look at is how to set up the Standard Event codes to give you more granular detail of the actions your visitors are taking.
How To Create Standard Event Codes
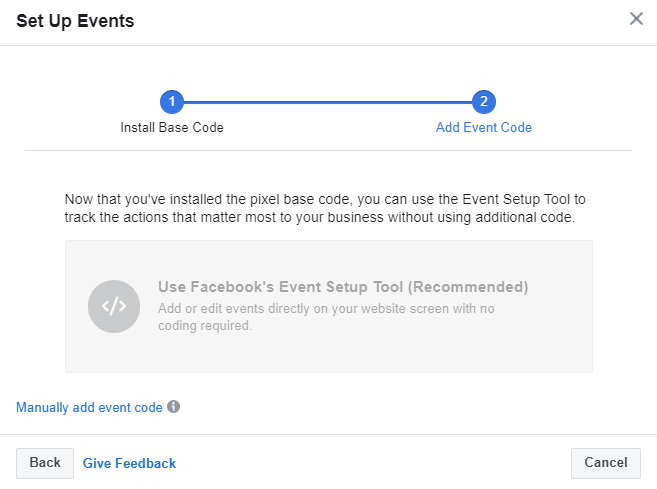
Let’s go back to the ‘Ads Manager’ where you should still have the html code showing. Now click on ‘Continue’.
You will then see a pop-up box to set up events. Facebook now have an Events Setup Tool that makes this part easier for those with little web developer knowledge, as you don’t need to add any additional code.
To do this, click on the grey box in the centre and you will be taken to a screen to add your website address. When you click on ‘Open Website’ a new windows tab will take you to your home page and a pop-up box will appear showing how the events code can be used. Click on ‘Get Started’.
You then navigate through your website to the actions you want to track. You can ‘Track a New Button’ (call to action) or ‘Track a URL’.
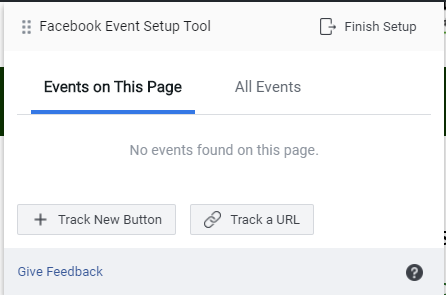
To track a call to action, select ‘Track New Button’. All buttons that can be tracked will be highlighted. Click on the call to action button and then select the relevant event. This could be purchase, subscribe, lead or any that fits your situation best. Once you have added the event, it will appear on the list of ‘Events On This Page’. You can also see all of the events set up by selecting the ‘All Events’ tab. However, this does not tell you which page each has been set up on.
If it is a specific page you want to track like a product page or an offer,. To do this, go to the page you wish to track and select ‘Track a URL’. Then select an appropriate event from the drop-down menu. In most situations, this will be ‘View Content’.
When you have selected all the events you wish to track, it is a good idea to go to each page and check that the events have been added. If you have the pop-up box set on ‘Events on this page’ you will see the events listed and an icon against the buttons selected.
![]()
Once done, click on ‘Finish Setup’ at the top right-hand corner of the pop-up box.
You will then see a list of all the events you have added. Click on ‘Finish’. The windows tab will close and you can then go back to the Facebook Pixel tab and an confirmation will appear.

How To Test The Events
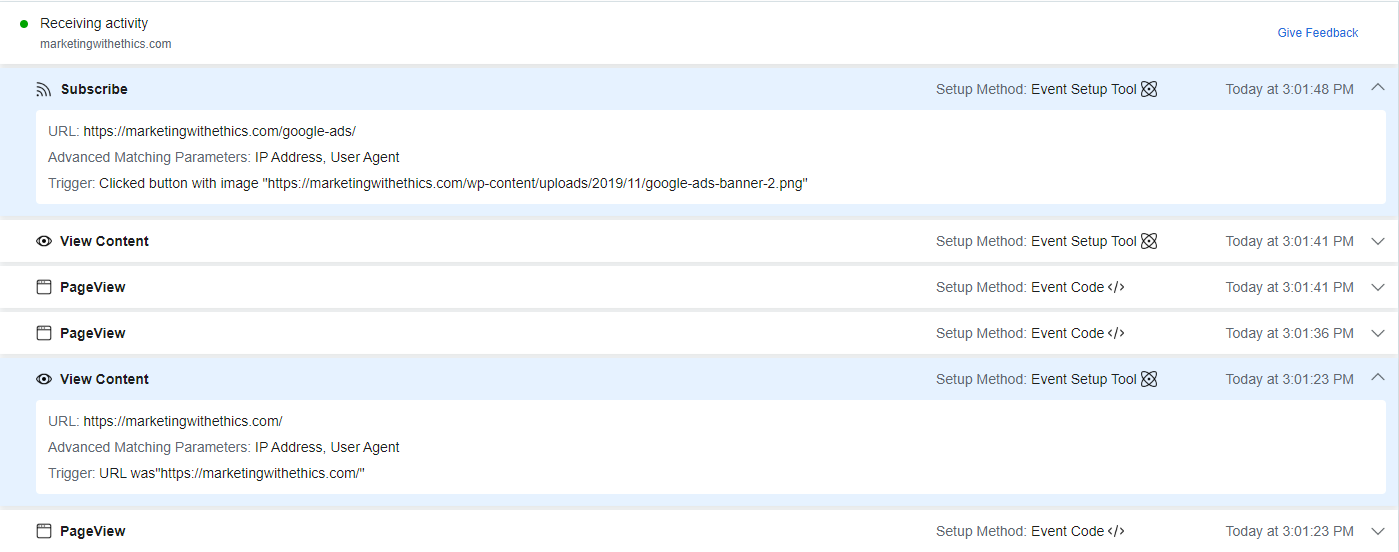
Now you want to test that the events are working correctly. To do this, click on ‘Test Events’. This will take you into a screen where you can see your events in Real Time. To test them, open a tab with your website and click on one of the buttons or pages you have set up to track.
As you click on each of them, the events will be listed. ‘PageView’ is created by the base code which is on every page. Your individual standard events will show separately. You can then click on them to confirm which event has been triggered as below.
Now you are all set to start receiving data about your website visitors’ actions and can create effective Facebook Ad campaigns that talk directly to your potential customers
What success have you had using Facebook Event Codes in your marketing? I would love to hear in the comments below.
Are Facebook Ads going way over your head? Do you need an effective campaign created and managed? Then book a FREE 30-minute Discovery call with me today to chat about your options. Simply click on the button below!